

-
Written By Evren Cole
-
Updated on August 7th, 2024
Archive Emails in Office 365 by Date Range: An Expert Guide
Summary: The number of emails in Office 365 mailboxes can take more time than usual while searching for specific emails. What if a user needs to archive emails in Office 365 by date range? Don’t panic! Keep yourself calm and stay tuned with this post to know the manual method and a professional Tool Office 365 Email Archiving. Download Now Purchase Now
Office 365 is a well-known and prominent email client that allows users to send, receive, and send emails. Besides, it comes with subscription plans that deliver extra benefits and increased storage space to subscribed users. There is an instance of circumstances when the user of Office 365 needs to archive Office 365 emails by date range to the external hard drive.
Archiving emails from the popularly used email clients depends on various reasons. The queries that were asked on Quora & Microsoft forums are based on mailbox size full, required emails from the date range, etc. Here, we will discuss the methods to archive emails in Office 365 by date.
User Query: ”I have reached the storage space provided by Microsoft Office 365 for my account. Now, I am searching for a method to archive Office 365 account emails by date range to exclude the unnecessary emails from the archive folder of Office mailboxes.”
How to Archive Emails in Office 365 by Date Range to Local Drive?
Continue reading the post to know the two different methods to archive Outlook 365 to a local/hard drive.
Method 1: Office 365 Outlook Archive Using Manual Technique
In the first method for Office 365 archive, you need to install Office 365 on your system. This method includes two phases for easy execution.
- Enable Archive Mailbox Office 365
- Auto Archive Outlook 365
Stage 1: Enable Archive Mailbox Office 365
Firstly, users need to enable archive mailboxes using the Security and Compliance Center. Follow the below instructions as mentioned for good results:
- Launch Office 365 email client on your system.
- Sign in by putting your account credentials to proceed.
- Now go to https://protection.office.com/
- On the left side of the Security and Compliance Center, select Data Governance.
- After that, click on Archive to display the archive page.
- On the Archive page, under the Archive Mailbox option, you can check whether the archive mailbox is enabled or not.
- Select numerous users to enable the archive mailbox and click Enable in the details section.
- Then, you will see a message on the screen with a warning. Here, click Yes to proceed.
- This process might take some time. To update the info in the Details segment, click on Refresh.
These steps will enable the archive mailbox in Outlook. Now move to the next phase to archive email Outlook 365. Also, you can also check the ways to save Office 365 emails to desktop, here.
Stage 2: Auto Archive Outlook 365 Manually
After enabling mailbox archive in Outlook Account, follow the given steps to Archive Office 365 Emails:
- Open your Office 365 email account again.
- Then, find and click on the folder to archive emails from the selected folder.
- After that, pick the preferred emails and right-click on them.
- A drop-down menu will emerge. Now, click on the Archive option from the displayed menu.
- Likewise, you can also choose the emails from the delete group followed by right-clicking on emails. Then opt for the Archive option from the drop-down menu.
The above procedure is workable and provides results. However, there are some limitations to using manual tricks for performing auto-archive Outlook 365. Let us look into these drawbacks in the below section.
Disadvantages of using the Manual Approach
These are some shortcomings of using the manual techniques to archive email in Outlook 365. They are as follows.
- Tedious and confusing process.
- Do not support archive Office 365 emails by date range.
- These steps require an in-depth understanding of Office 365. Users also need technical knowledge to complete the process.
- It doesn’t guarantee data security during the entire process.
The above points are the reasons why experts don’t recommend manual ways. Now, let’s move to a reliable method to archive Office 365 mailboxes by date range.
Method 2: Archive Emails in Office 365 by Date Range -Professionally
The Office 365 Email Archiving is the proficient utility to archive emails from O365 with all attachments. It helps to archive emails from Office 365 to MBOX, PST, EML, MSG, CSV, HTML, MHTML, EMLX, and TXT formats. The best thing about this utility is it maintains the data integrity during the archiving process.
Steps to Archive Emails in Office 365 by Date Range
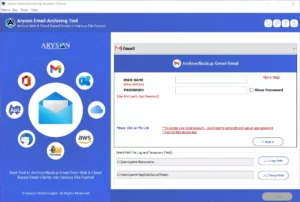
- Download and start the Office 365 Email Archiving.
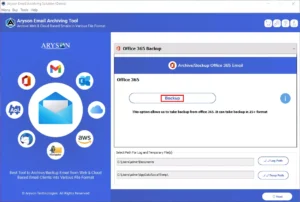
- Now tap on the Backup option from the software interface.
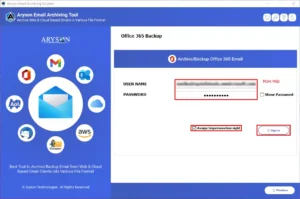
- After that, enter your Office 365 account credentials and hit on Sign in button.
- Opt for the scanned and displayed Mailbox folder.
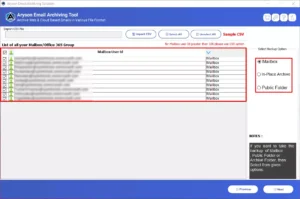
- Now, click on the Next button to proceed.

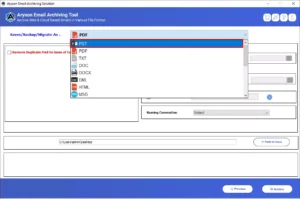
- Choose the File format in which you want to save your data.
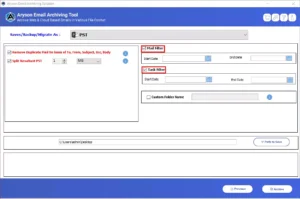
- Select the Mail filter option to archive emails by date range from Office 365 account.
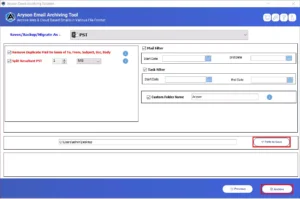
- Hit on the Path to save button and finally, press the Archive button to archive Office 365 Emails by date range.
Conclusion
This post provides information about the effective ways to auto archive Outlook 365. It involves manual tricks with easy steps to archive Outlook 365. However, the manual process has some disadvantages & drawbacks. Therefore, we also discussed a powerful and proficient utility to archive emails in Office 365 by date range.
About The Author:
Evren Cole is an expert in Email and Data Management. She has a strong passion for technology and entrepreneurship. In her free time, she enjoys football, music, and reading books.
