

-
Written By Shivam Rathore
-
Updated on July 12th, 2025
How to Import OST to Office 365: A Step-by-Step Guide
Summary: stands for Offline Storage Table. When you use Microsoft Outlook with an IMAP account, Outlook keeps a local copy of your mailbox on your computer as an OST file. However, an OST file is designed to work with the Outlook profile that created it. As a result, you can’t directly upload or import OST to Office 365. If you’re looking to do so, this blog will guide you through the process. Here we discuss all the essential information regarding this. Also, you can directly use the OST to Office 365 Migration Tool for a quick and hassle-free solution.
Top Reasons to Import OST File into Outlook 365
There are numerous reasons why the user might need to open their OST file in Office 365. Some of the main reasons are:
- If you are switching to a new computer or PC, and want to access your old emails.
- When your Outlook profile is damaged or deleted, you want to recover your mailbox.
- You want to restore accidentally deleted emails using a backup OST file.
- In cases where you’ve lost access to the original server, retrieving the stored data becomes necessary.
- Sometimes, you want cloud access to your older emails stored locally in OST format.
How do I Import OST to Office 3655?
Different methods are available to upload your emails from OST to Office. You can use:
- Manual Method: Convert OST to PST, then import PST into Office 365.
- Proficient Tool: Directly import your OST files to Office 365.
Method 01: Free Way to Upload OST to Office 365
Since you can’t directly upload an OST file to Office 365. The most common free method is to convert the OST file into a PST file. Then, import that PST into your Office 365 mailbox.
Step 01: Convert OST to PST Using MS Outlook
This method works only if you still have access to the Outlook profile that created the OST file.
- First, open Microsoft Outlook on your computer.
- Now, click on File in the top-left corner.
- Select Open & Export, then click on Import/Export.
- Then, pick Export to a file and proceed by clicking Next.
- Choose Outlook Data File (PST) and click Next to proceed.
- After that, choose the mailbox folder that you want to export.
- Finally, choose the destination for the PST file and hit Finish.
You can also use an alternative method to convert an OST file to a PST, which is mentioned below:
Alternative Method to Convert OST File to PST
You can also use this method to import OST to Office 365. Here, we can create a new PST file and copy the OST data into it. Then, proceed to the next step:
- Primarily, open Outlook and click on New Items.
- Choose the More Items option and select Outlook Data File.
- Once the new PST file is created, transfer all the data from the OST file into it.
- Select the file or folder and right-click, choose the Move option.
- In the end, click on Other Folder and press OK.
Step 02: Import PST to Office 365
Now, your OST file data is in PST format, you can import it into Office 365 by using these steps:
- Again, open MS Outlook and click on File.
- Then, choose the Open & Export option.
- Now, select Open Outlook Data File.
- After that, browse and select the PST file you just exported.
- This will open your PST file as a separate folder within Outlook.
- Drag and drop emails from the PST folder to your Office 365 mailbox folders.
Things to Remember!
As you know, the manual method is free to use. But it has several limitations that create trouble during the conversion, such as:
- You can only import a small amount of data.
- During OST to PST conversion, there is a chance of losing your information.
- This process can take more time and offers a slow processing speed.
- Moreover, a risk of losing data confidentiality and integrity.
Method 02: Hassle-Free Way to Import OST to Office 365
To avoid all the limitations of the manual method, you can use the OST to Office 365 Migration Tool. This tool batch uploads OST files to Office 365 with complete accuracy and without data loss. You can also perform bulk conversion without any hassle. Furthermore, it helps to import OST file into Thunderbird and other email clients. With this simple and user-friendly interface, all users can easily operate it. This software runs for all versions of Windows OS, including Windows 11, 10, 9, 8, etc.
Can You Directly Add OST File to Outlook 365?
With the help of the OST to Office 365 Migration Tool, you can easily add your OST file to Office 365. This software offers advanced features, such as:
- You can delete duplicate OST file data with the Remove Duplicate option.
- Preview features allow you to cross-verify the data before performing the process.
- The Date Filter indicates that only selective data can be migrated based on Dates.
- Moreover, provides a fast processing speed and supports oversized OST files.
How to Open OST File in Outlook 365?
Simple Steps to open OST file in Outlook 365:
- Firstly, launch the OST to Office 365 Migration Tool as an admin.
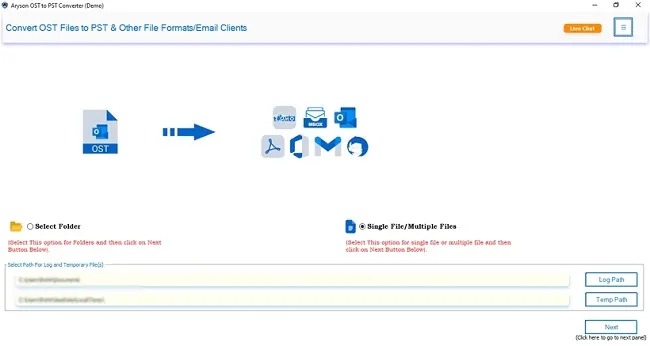
- Now, mark Select File or Select Folder and add OST. Click Next.
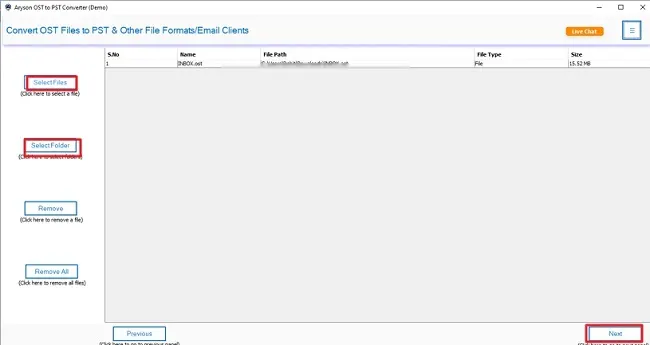
- Select the file for import, review it, and click Next.
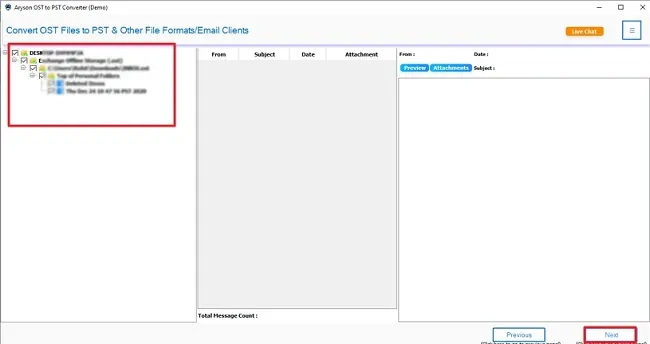
Click Next
- After that, select Office 365 as the saving format and enter its credentials to Sign In.
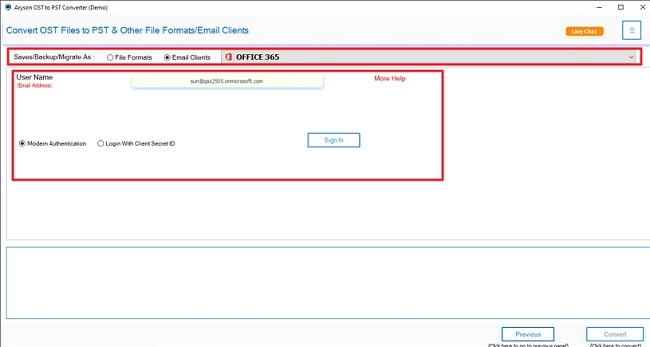
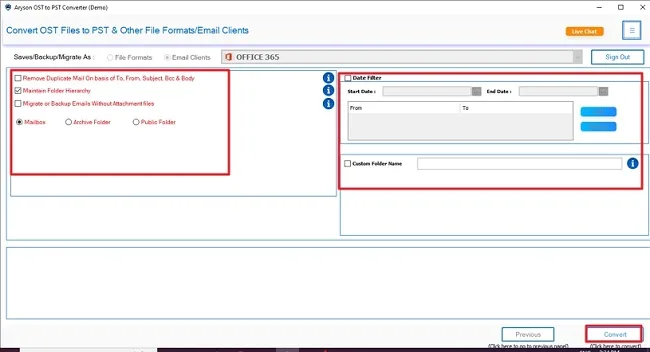
- Finally, apply useful features or filters and click Convert.
Final Words
To wrap up, we discussed different methods to import OST to Office 365. The manual method can be hectic and tedious to perform. In addition, it doesn’t deliver accurate results, especially if the OST file is large or the original Outlook profile is no longer accessible. For an accurate, reliable, and secure process, you can use the professional tool. It saves time, reduces errors, and ensures your email data is transferred safely and completely.
Frequently Asked Questions
Qns.1: How do I import an OST file into Office 365?
Ans: You can import OST to Office 365 by using these steps:
✅First, download the OST to Office 365 Migration Tool.
✅Click on Select Files and choose OST file to import. Press Next.
✅Then, cross-verify and mark the OST files. Hit Next.
✅Choose Save as Email Client & Office 365 from the list.
✅Enter Office 365 credentials, like ID & Password, to Sign In.
✅Lastly, use advanced features and click Convert.
Qns.2: Is this software able to upload OST to Office 365 in bulk?
Ans: Yes, the OST to Office 365 Migration Tool is helpful to import OST file into Office 365 in bulk. You can select multiple files at once by choosing the Select Files or Select Folder option.
About The Author:
Meet Shivam, a Microsoft-certified expert who has helped many people fix problems with Outlook and Office 365. He likes writing about email tools and moving data. He’s always happy to share easy tips, clear guides, and useful updates to help people solve tech problems.
